Open Image in new window for large printable version.
You will need:
The Board (above), printed or recreated on an A3 (Tabloid) Size sheet of Paper or larger.
At least 2 to 4 Players
(10 to 20 minutes play time)
An Opaque Bag (Dig bag) that contains:
The cubes used are standard board game cubes (like you get in the “Pandemic system”) in various colours.
- 1 Yellow “Treasure” cube.
- 71 Black “Dirt” cubes
- 12 Red “Bobby Dazzler” cubes
- 24 Blue “If So” cubes
- 28 Green “Ad Break” cubes
To the side of the play area you will also have
- Pile of $100 notes (Monopoly Money)
- 36 “Clue” tokens (use anything for these).
- One token/meeple for each character (Blue, Green, Red, Black, Purple, Yellow, Orange, White, Pink).
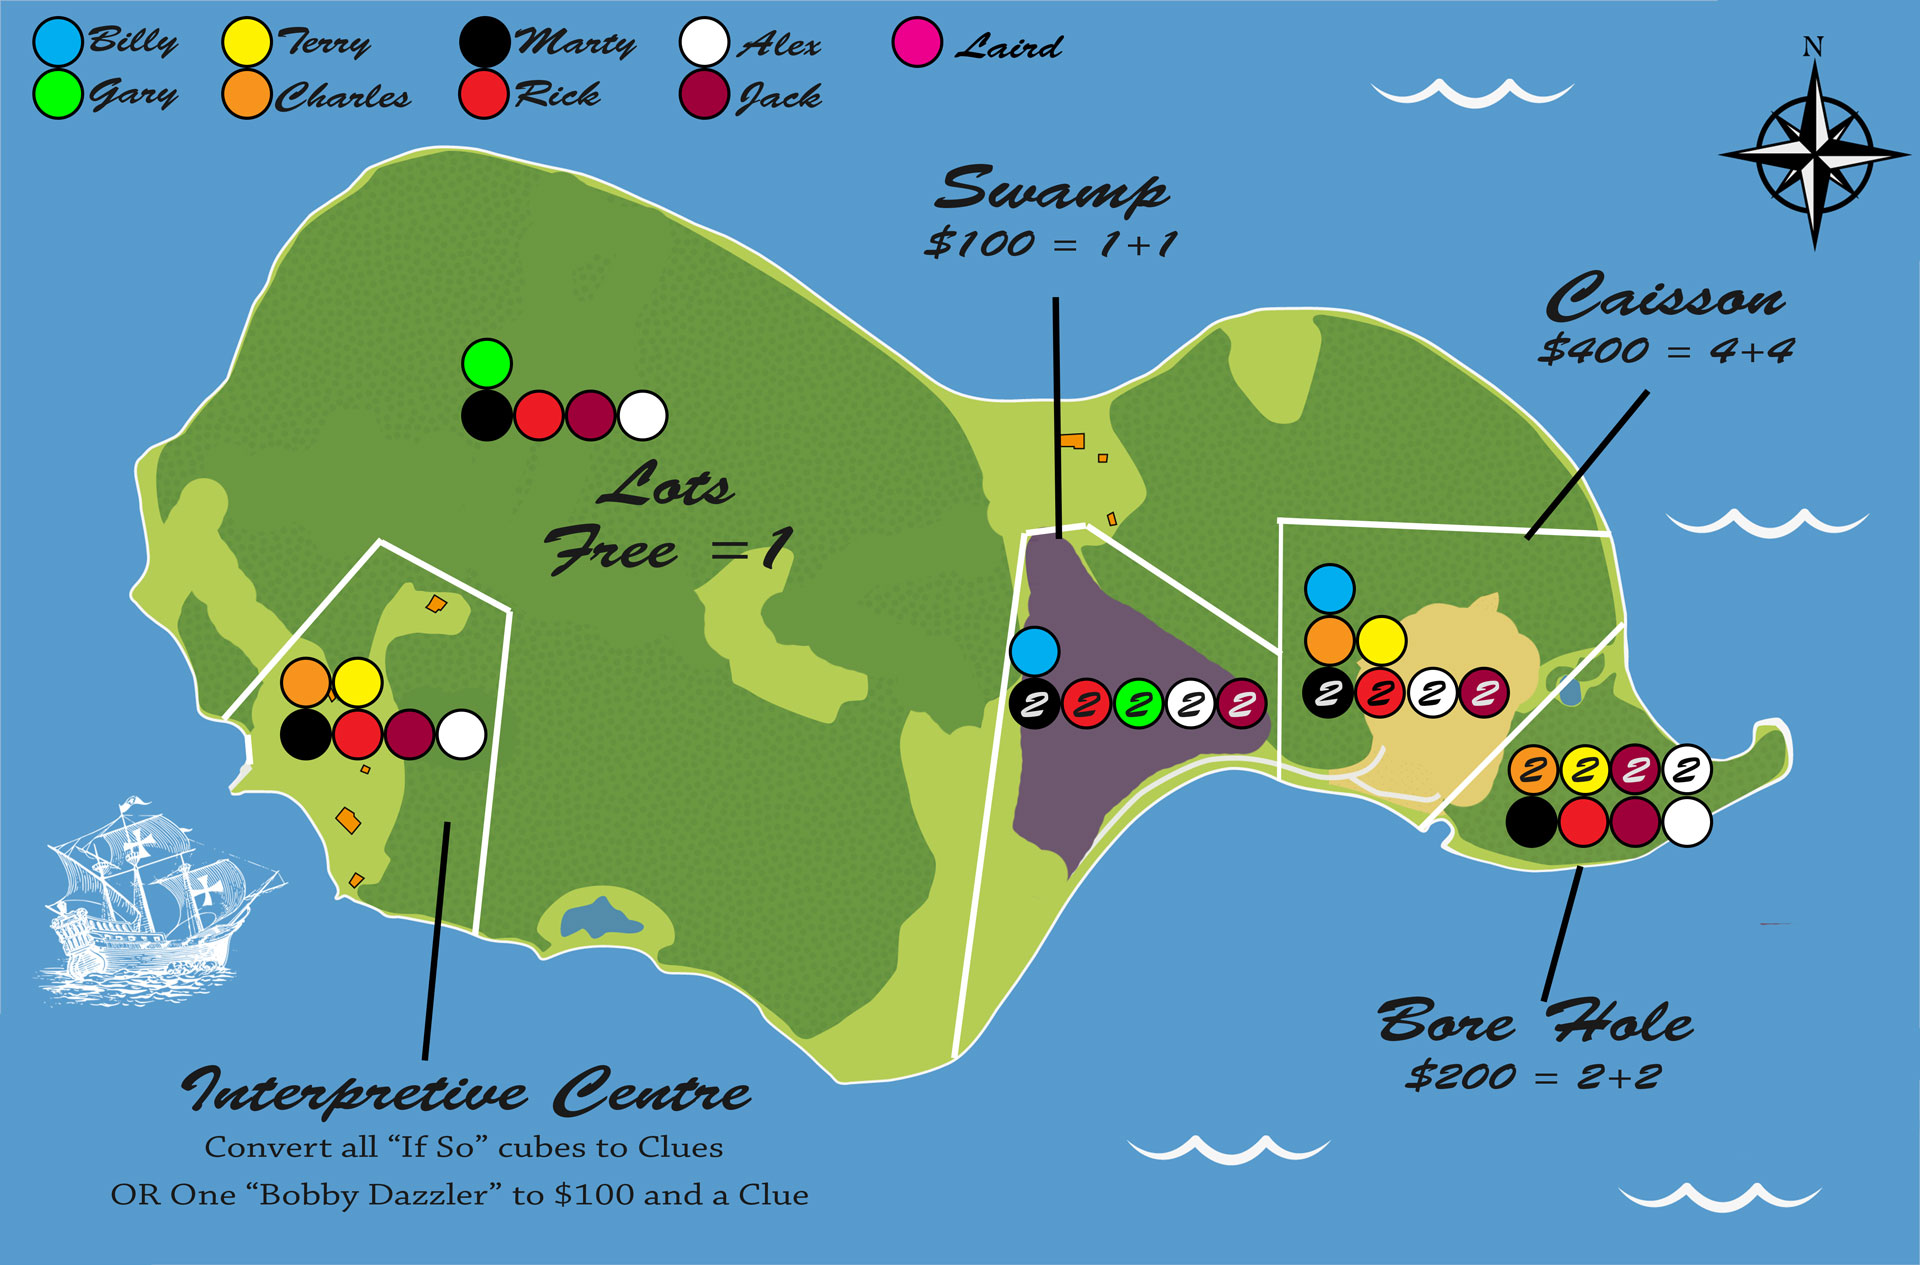
Start the Game with the Pink “Laird” Character Token on the Interpretive Centre location (not on a coloured circle).
How to play
Each Round has one “War Room” Phase, and two “Episode” Phases.
Play Rounds until someone pulls the Yellow Treasure Cube from the Dig Bag and wins.
War Room Phase
Each Player receives starting money $100 from the bank.
All Character Tokens (Except for Laird) are placed on the Compass (War Room) on the top right of the board.
Players then take turns (clockwise) moving any one Character from the Compass to another location on the map.
Or, you can relocate a character that has already been moved for $100 dollars – paid back to the bank.
Note: Each War Room Phase, and Episode Phase, the player who moves a character first is determined by who has the most Bobby Dazzlers, if a draw, who has the most Money, if a draw the youngest player goes first.
Once all characters have been moved out of the War Room, the first Episode Phase starts…
Episode Phase 1
Players now take 1 Action each; by selecting a Location that is Active and performing the Action for that Location (“Digging” from the bag, or using the Interpretation Centre). Skip your turn if not able to perfom an Action.
A Location is considered Active when it contains the required Characters. Each Location has a row of coloured circles, these show the requirements to make a location ‘Active’. There must have a at least one character of a specific colour present on each row; and some rows require two characters to be present.
Example “Swamp”:
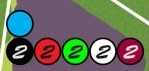
The Swamp shows a Blue “Billy” circle on the top row, which means that Billy must be present. There is also second row that shows Marty, Rick, Gary, Alex, or Jack must also be present. However, this second row also shows a “2” in each circle, which means the location must have two of those characters in this row. Therefore, to make this location Active, there must be three characters in total, one of which must be Billy, and two of the others shown.
Example “Caisson”:
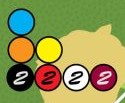
Billy must be present, and either Terry or Charles must also be present, and two more characters must also be present from a choice of Marty, Rick, Alex, or Jack.
You must also have the required amount of Money shown at the location to perform the Action. You pay this to the bank when performing the Action.
Each Location (except Interpretive Centre) will allow you to Dig a number of cubes from the bag. (It’s best to do this one at a time for dramatic effect.) The number of cubes you can dig is shown on the board (before the + symbol). ie. The “Lots” location allows 1 cube, The “Swamp” is 1 cube. Bore Hole allows 2 cubes, and Caisson allows 4 cubes.
Note: Each player will keep a pile in front of them made up of “If so” and “Bobby Dazzler” cubes; So it’s best when taking an Action to dig cubes, to place all cubes pulled from the Dig Bag into the middle of the board first; and then, sort the cubes by placing all Dirt Cubes and Money Cubes to the Dirt Pile (a pile of dirt cubes accumulates to the side of the play area), and all other cubes (Red and Blue) into your personal spoils pile in front of you.
For each Blue Cube you dig out, you should say “If so”. For each Red Cube you dig out you should say “It’s a Bobby Dazzler!”. For each Green you pull out you can say “Ad Break!”.
If you Pull the Yellow Cube out you win the game instantly.
When performing the Swamp, Bore Hole, or Caisson dig action, you may take extra cubes from the bag for each Clue Token you own. However, there is a limit to how many extra cubes can be pulled, this is shown on the board after the + symbol. For example, when you dig a Bore Hole, and you take 2 cubes from the Dig Bag, if you have 1 to 6 Clue Tokens – you are allowed to Dig an extra 1 or 2 cubes from the Dig Bag.
Note: If you Dig a Red Cube during your turn at the “Swamp” or “Lots” Locations, place the Laird token in front of you (even if someone else currently has it).
Note: You can only have a total of six “If so” and “Clue Tokens (combined) in front of you. Any excess you pull from the Dig Bag on your turn should be returned to the bag at the end of your turn.
When you pull a Green cube, you instantly get $100 from the bank.
Episode Phase 2
Same as Episode Phase 1. But, no moving characters around. Just play another round with all characters where they are.
After this Episode Phase 2, start another round with the War Room Phase.
Interpretation Center
There is a location on the map for “Interpretation” Centre. If this is active, you can perform this Action instead of digging, to trade any number of your “If so” cubes for a Clue Token, or $100 each. (So you could trade 2 “If so” cubes for 2 Clues, and another “If so” for a $100.
OR
Us this Action to convert one Bobby Dazzler into $200 and a Clue Token.
(ie. You can’t trade If So and Bobby Dazzlers in the same Action)
Keep Clue Tokens in front of you.
When “If so” cubes and “Bobby Dazzler” cubes are converted in this way, They are removed from the game (put them in the Dirt Pile).
Laird (The Archaeologist)
If you have Laird in front of you at the start of your turn, you can’t dig in the “Lots” or the “Swamp”.
You can get rid of Laird by using the Interpretation Centre Action on your turn, he follows you there and stays there; move the Laird token from in front of yourself, and place it near the Interpretive Centre.